The house is filled with the earthy smell of mushrooms cooking. It's
not a welcome-to-winter soup simmering or a ragout thickening; I'm
baking a little mushroom footstool in the oven.
That's not all that's baking in that house, you may be thinking.
The footstool is the product of a furniture-making class taught by Philip Ross
at the Workshop Residence in San Francisco's Dogpatch neighborhood
midway through the fall. To call it a mushroom footstool is technically
accurate, but slightly misleading - it comes out of the oven looking
like weathered concrete and feels slightly spongy, like cork. Only the
pungent smell gives away the footstool's nature.
Sunday, December 16, 2012
Saturday, October 27, 2012
Roasted Squash Soup (Recipe)
Roasted Squash Soup
This recipe makes some delicious squash soup, which is a healthy
way to keep yourself warm as the evenings turn cool. If you like a creamy,
herby, or spicy soup, there are some flavor variations included below. I recommend using a sweet, dense-fleshed
winter squash such as butternut, buttercup, or kabocha. Alternatively, you
could use half squash and half sweet potatoes. Recipe makes 4-6 servings.
Ingredients:
Ingredients:
4 cups roasted winter squash, peeled and cubed (Note: this
is about two medium sized squash. Roasting directions are below.)
1 medium onion, diced
2 cloves garlic, crushed or finely chopped
1 stick celery, diced
2 large carrots, diced
3 cups vegetable stock
1 cup dry white wine, such as Chardonnay or Sauvignon Blanc
2 tablespoon extra virgin olive oil
1-2 cups water for roasting
Sea salt and fresh ground black pepper, to taste (amount
also depends on the saltiness of your stock)
Optional Creamy Addition: half a cup of cream, “half and half”,
soymilk, coconut milk, or almond milk
Garnish with: a spoonful of Greek yogurt or a sprig of fresh
parsley in each bowl
Optional herb and
spice twists (if you wish, choose one of these and add a greater amount of the
flavoring if needed):
Parsley: Half a cup of
chopped parsley. Puree squash soup first and then add the parsley at the end,
just before turning off the heat.
Pumpkin pie spice: Half
a teaspoon of pumpkin pie spice
Curry: 1 teaspoon of
curry powder
Nutmeg: Pinch of fresh
ground nutmeg
Ginger: Half an inch
of ginger root, peeled and finely chopped, added at saute stage
BBQ: 1 tablespoon
barbecue sauce
Citrus: Half a cup of
orange juice, plus the zest of one lemon or lime
Spicy: 1 small
jalapeno pepper, diced, added at the saute stage
Healthy: Half a cup or
one cup of finely chopped garden greens, such as spinach, chard, arugula, kale,
collards, or mache. Puree squash soup first and then add the greens at the end,
cooking them for just a minute or two before turning off the heat.
Roasting the
Squash
Wash the squash. Cut it in half and scoop out the seeds. In
a large roasting pan, place squash halves cut side down and then fill bottom of
pan with a cup or so of water. Cook in oven at 375 F degrees, adding more water
if the pan dries out. Cook for 30 minutes or until squash is fork tender. Remove from oven,
let squash cool, and peel off skin. Cut roasted squash into one inch cubes.
Recipe Directions
1. Heat the oil in a large pot over medium heat. Add the
diced onion and saute it for two minutes. Then add the garlic, carrots, and
celery, sauteing it until the onion is translucent. If the garlic starts to turn brown, pour in some vegetable stock and immediately move onto the next step (or else it will turn bitter).
2. Add the roasted, cubed squash, the dry white wine, and the
vegetable stock. Add the salt, pepper,
or any optional flavoring. Bring soup to a boil, cover pot, and reduce heat to
a simmer. Let it cook for 10-15 minutes until all ingredients are soft, then
turn off heat and let soup cool for awhile.
3. Puree soup using blender, food processor, or hand
blender. Once it is smooth, pour pureed soup back into the big pot. Taste it
and season it as needed, using salt and pepper as well as any of the optional
herb or spice flavorings. Add the optional cream or cream substitute. Stir in
any of these new ingredients and, if necessary, cook the soup a little longer.
Then turn off the heat, serve, and enjoy!
Recipe adapted from "Butternut Squash Soup" at Allrecipes.com
Friday, September 21, 2012
How to Make Rejuvelac (book excerpt)
Here is an excerpt from my newest e-booklet, entitled How to Make Probiotic Drinks for a Raw Food Diet: Kefir, Kombucha, Ginger Beer, and Naturally Fermented Ciders, Sodas, and Smoothies.
How to Make Rejuvelac
Rejuvelac is a fermented beverage made from sprouted cereal grains,
such as wheat, barley, rye, oats, triticale, millet, amaranth, quinoa, brown
rice, wild rice, or buckwheat. This healthful drink is almost as easy to make as yogurt. It can be ready in 3-4 days.
You
can use yogurt whey (the liquid from yogurt) or naturally occurring yeast and
bacteria to ferment it. People have been making fermented drinks with grains
for thousands of years, but the raw food advocate Ann Wigmore is credited with
popularizing rejuvelac as part of a holistic health diet.
Rejuvelac
is pretty sour, tasting much like the liquid whey from plain yogurt, so on its
own this drink is an acquired taste. As with plain yogurt, you are welcome to
add other flavors and sweeteners to rejuvelac. Personally, I can’t drink it
plain without gagging, but it becomes a lot more palatable if you add some
sweetener after the ferment, such as fruit juice, maple syrup, or honey.
Rejuvelac also makes a simple and effective fermented base for sodas or
smoothies. This is a very healthy probiotic and quite easy to make.
First,
you need some whole grains. Wheat, barley, oats, and rye are usually the
cheapest and easiest to sprout. Even with the best of strainers, the small
seeded grains, such as millet, amaranth, and quinoa, become pretty difficult to
wash without losing some down the drain. I recommend using only organic grains
if you can find some, because you will know they are free of any pesticides.
Besides damaging your body, such chemicals may interfere with the fermentation.
You
can either buy sprouting seeds, such as the hard red winter wheat that is
generally grown to make wheatgrass juice, or you can just get some grains from
a bulk bin at your local health food store. As long as you can find whole
grains that are fairly fresh (which you can only confirm by trying to sprout
them), then they should germinate reliably. It will take 1-2 days to sprout the
grains. For a more comprehensive guide to sprouting raw foods, I recommend my
short book How to Sprout Raw Food: Grow an Indoor
Organic Garden with Wheatgrass, Bean Sprouts, Grain Sprouts, Microgreens, and
More,
which is available in e-book and print editions on Amazon.
Making Rejuvelac
Recipe makes one quart
Required materials:
One
glass jar (a quart-sized Mason Jar works well)
Strainer,
cheesecloth, or a sprouting lid for the jar
One
large container (large enough to hold two quarts of liquid, glass or plastic)
Ingredients:
Half
cup of whole grains
Water
Process:
1.
Rinse
the grains. Put them in the jar and cover with water. Let them soak overnight.
2.
In
the morning, drain the water from the grains, rinse them, and put them back in
the jar.
3.
Rinse
the grains at least twice a day to prevent mold. Continue this for 1-2 days
until you see little sprout tails on each of the grains.
4.
Rinse
the grains one more time and put them in the large container. You could use the
same jar if it’s big enough. Make sure to clean it well before using it again.
5.
Cover
the grains with one quart of filtered (non-chlorinated water).
6.
Optional:
Add a couple of tablespoons of yogurt whey (the liquid from some good quality
yogurt). This provides the culture necessary to ferment the beverage. If you
use whey, it will ferment more quickly, probably in 1-2 days. Without this, you
will need to wait for the natural yeasts and bacteria to proliferate, which may
add another day or two to the fermentation time.
7.
Cover
the container loosely. A loose lid, a towel, or cheesecloth works well. Place
the container in a quiet place away from direct sunlight. Every 24 hours, use a
clean spoon to taste it. The Rejuvelac should taste sour like yogurt. The ferment
may take from 1-3 days depending on the temperature and strength of the
culture.
8.
Once
it is ready, strain the rejuvelac into bottles or jars to cover and
refrigerate. The spent grains can go in your compost. The best part of them is
left in the water for you to drink. You can dilute it or add some fruit juice,
maple syrup, or honey to make it tastier. Or use it as a base for the smoothies
and sodas mentioned later in this book.
Thursday, August 30, 2012
How to Get Kids to Love Their Veggies
Below is a short excerpt from my "How to Grow Potatoes" booklet, which is available on Amazon. From what I've seen, kids will eat a lot more veggies and fruits (not just potatoes) if you get them involved in growing some of their own organic food. Carrots, tomatoes, peas, cucumbers, blueberries, and fruit are other examples of fresh foods that my kids love to pick and eat from the home garden.
Kids
love picking potatoes. Finding those white, gold, purple, and red tubers in the
soil is like uncovering buried treasure. If you cannot get your kids to eat
their vegetables, try involving them in the garden (even if it’s just one
container on your doorstep). When kids see where their food comes from and
share in the excitement of harvesting it, everything changes. They become far
more likely to eat and enjoy their veggies (okay, not all their veggies, but
more than before).
Many
vegetables in our garden (cucumbers, carrots, snap peas, and tomatoes) never
even make it into the kitchen. Kids eat them on the spot. This does not hold
true with spuds, which are cooked before eating, but they’re quite the popular
item after that. One of our kids loves potatoes and the other one doesn’t, but
both are eager to eat them once reminded that “these are the potatoes you
picked.” It makes a huge difference.
Do
not rely on my opinion alone. Read an article entitled, “Children Eat
More Fruits and Vegetables If They Are Homegrown”, in Science Daily. The article
reported on a study at Saint Louis University. The study provided clear
evidence that kids who eat homegrown produce are twice as likely to eat their
fruits and veggies every day. This is, most likely, a lifetime benefit.
Thursday, August 16, 2012
Free E-book This Saturday
Free E-book This Saturday: How to Sprout Raw Food
I recently finished work on my latest e-book, entitled How to Sprout Raw Food: Grow an Indoor Organic Garden with Wheatgrass, Bean Sprouts, Grain Sprouts, Microgreens, and More. This book will be offered as a FREE download this Saturday, August 18. Just click on the link above or check Amazon's Kindle Store.
In the meantime, here is an excerpt from the section covering sunflower sprouts:
Sunflower (2-3 days for
sprouted seeds, 5-6 days for young sprouts, 10-12 days for microgreens)
Sunflower
sprouts are some of my favorites. They have a rich, nutty flavor and crisp
texture that makes for very tasty eating. They go well on sandwiches or in
salads, they can be juiced, or they can be eaten plain. Sunflower seeds and
their sprouts are high in protein, minerals, and vitamins A, B group, D, and E.
You
can eat these at virtually any stage of growth. Of course, you’ll need to eat
them before they become six foot tall sunflower plants in your garden! If you
start with hulled sunflower seeds, you can sprout them for a couple of days to
get sprouted sunflower seeds with little tails. Beyond this stage, you will
need to grow sunflower seeds in a tray filled with soil or growing medium,
because they shoot up quickly and they need the nutrition and physical support
of soil. Sunflower seeds will not perform well in most sprouting devices.
Tender
young sprouts can be harvested in five days or so or you can wait until 10 days
of age for full-fledged microgreens. If you’re growing them for vegetative
sprouts, you can use seeds in the shell rather than hulled seeds. Just sprinkle
them on top of wet soil or growing medium, keep them moist, and they will grow.
The
sunflowers people normally grow in home gardens produce black-and-white striped
sunflower seeds, the kind they sell as a salted snack at baseball games.
Another kind, called black oil sunflower seeds, also produces great sprouts and
microgreens. If you have pet birds, you may have seen black oil sunflower seeds
before; they’re a little bit smaller than stripeys and jet black in color. I often
feed them to my backyard
chickens as a treat.
Unfortunately,
not all your seeds will sprout. It can be very difficult to find fresh
sunflower seed that germinates at anywhere close to 100%. Keep trying different
seed suppliers until you find one with seeds that sprout well. Where sunflower
seeds are concerned, I have found the cheap bulk bins at my local health food
store to have fresher raw, organic sunflower seeds than any of the specialty
suppliers of sprouting seed.
Please click below for the rest of the book. I hope you enjoy it! How to Sprout Raw Food: Grow an Indoor Organic Garden with Wheatgrass, Bean Sprouts, Grain Sprouts, Microgreens, and More.
Wednesday, July 18, 2012
Long Orange Firecrackers
In our home garden, we just picked carrots this week. From one raised bed, my kids unearthed an armload of long orange firecrackers. Picking carrots, potatoes, and root/tuber vegetables is such a satisfying harvest. There is something special about bringing up buried treasure: you're never quite sure what is hidden until you pull it out of the ground.
Most people love the taste of carrots, which are very nutritious and versatile in the kitchen. Their sweet, earthy flavors are a welcome addition to almost any dish, sweet or savory. But quite honestly, the only carrots that get cooked at our house are the ones we buy in the store. The ones we grow don't make it to the kitchen; they are so much tastier that they are eaten first.
Homegrown carrots are so good we tend to eat them all raw. When the kids are pulling up carrots, they don't even want to wash them before taking a bite. Once the roots are rinsed, my kids will eat two or three large carrots before they slow down. We put them in school lunch boxes and they disappear. There's no shortage of vitamin A this time of year.
As soon as we pick carrots, a light bulb flashes in my head. It's the reminder to plant more carrot seeds, which I plan to do very soon! Carrots prefer cool temperatures, so in the hot days of late summer, give them plenty of water and perhaps a little shade.
In a mild climate, you can grow carrots year-round. If your winters are cold, hard frosts and temperatures in the teens will kill off the foliage, but carrot roots can remain in the ground even into winter. Just cover them with a thick mulch, say six inches of leaves, straw, or sawdust, which should protect the roots for now. If your soil stays workable, you can dig them up as needed over the winter. Otherwise, you should get them out before the ground freezes up solid or else wait until early spring to pull them out. When you buy seed, you can look for overwintering varieties if this is what you plan to do.
For more information on growing carrots and other hardy cool season vegetables, please see my Fall and Winter Gardening e-book (click here for the link). And if you're a parent, involving kids in the garden is the best way to get them interested in eating their veggies. Carrots may be the easiest place to start. If your kids don't like the ones from the store, wait till they taste real homegrown carrots.
Tuesday, July 10, 2012
Free E-book on Thursday, July 12th
Stay tuned for a free download this Thursday, July 12th. My new e-booklet, entitled Best Chicken Breeds, will be offered for free that day on Amazon. This new book makes a great supplement to Backyard Chickens for Beginners, the comprehensive beginner's guide to raising chickens in your yard, which has been a smash hit.
Best Chicken Breeds covers 12 breeds of chickens that lay lots of eggs, have friendly and calm temperaments, and can fit in small, city backyards. There is a lot of information on chicken breeds online, most of it for free, but it took me many hours to research everything, sort through all this raw material, and synthesize it into what I really wanted: some good recommendations for the best backyard egg layers and pets.
Did you know there are 175 different kinds of chickens? I narrowed down this list to 12 breeds that make the best backyard egg layers and have nice personalities. As a BONUS, I am including an overview of 5 additional breeds of exotic poultry chickens that also are suitable for raising in backyards.
It took me a long time to learn about all the various breeds. Rather than make you go through the same trouble, I am sharing my findings with you in this short e-booklet. If your time is worth more than $1 per hour, then I believe you'll find this book is worth its modest price.
And this Thursday, you can get the new e-booklet for free. Just click on my author name at the top of this screen and it should show you my list of titles, including this one. I hope you enjoy the book and find it useful!
Saturday, June 23, 2012
Arugula for Fall and Winter Gardens
Arugula is one of my favorite organic vegetables. It is expensive in the markets but extremely easy to grow in the home garden, even in pots and other containers. I just finished writing Fall and Winter Gardening: 25 Organic Vegetables to Plant and Grow for Late Season Food, my latest e-book (it's now online, so please click on the title to take a look). Arugula is one of the 25 late season vegetables you can grow well into the fall and even winter, since it is hardy down to at least 15 degrees F.
Here is a brief crop profile from the book:
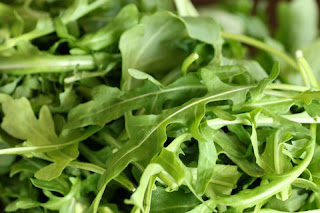
Arugula
is a vigorous plant with green leaves that carry a sharp, peppery flavor. It
has been a favorite at many gourmet restaurants. Young leaves are somewhat mild
and can be eaten raw in salads. They are commonly used in salad mixes to
provide an element of spice. Larger leaves are spicier and need to be cooked,
which removes much of the sharp flavor. Those who enjoy the taste of arugula
can use it as a spinach substitute in any recipe. Arugula is a great source of
vitamins A and C as well as iron. Here is a picture.
I hope you try growing some this fall. If you like baby salad greens with a peppery tang, you'll love this fast and easy growing vegetable!
Here is a brief crop profile from the book:
Arugula (Roquette)
·
Edible
Portion: Leafy greens
·
Days
to Maturity: 35 for baby leaves, 45-50 for larger leaves
·
Spacing:
Space seeds 4-6 inches apart in rows 6 inches apart
·
Planting:
Plant seeds ¼ inch deep
·
Temperature
for Seed Germination: 40 F (min.), 67 F (ideal)
·
Germination
Time: 5-7 days
·
Transplant
Seedlings at: 2-4 weeks

I hope you try growing some this fall. If you like baby salad greens with a peppery tang, you'll love this fast and easy growing vegetable!
Subscribe to:
Posts (Atom)